Phones are getting better at backing up data automatically, but unfortunately, you can lose your phone or fall into the water and lose everything, you can factory reset your Android mobile.
There are many ways to back up that data. The teXet smartphone user knows how important it’s to back up important content on their smartphone. If you are an teXet phone user and need to understand the way to back up your teXet phone content.
You will not miss your contacts, audio, videos, photos, messages, or any other content from your phone. Your search ends here.
Select your mobile
- BackUp teXet X8 Mobile
- BackUp teXet X4 Mobile
- BackUp teXet X-style Mobile
- BackUp teXet X-start Mobile
- BackUp teXet X-square Mobile
- BackUp teXet X-smart Mobile
- BackUp teXet X-slim Mobile
- BackUp teXet X-shine Mobile
- BackUp teXet X-selfie Mobile
- BackUp teXet X-quad Mobile
- BackUp teXet X-point Mobile
- BackUp teXet X-plus Mobile
- BackUp teXet X-omega Mobile
- BackUp teXet X-navi Mobile
- BackUp teXet X-mini 2 Mobile
- BackUp teXet X-mini Mobile
- BackUp teXet X-mega Mobile
- BackUp teXet X-medium plus Mobile
- BackUp teXet X-medium Mobile
- BackUp teXet X-maxi qHD Mobile
- BackUp teXet X-maxi 2 Mobile
- BackUp teXet X-maxi Mobile
- BackUp teXet X-line Mobile
- BackUp teXet X-force Mobile
- BackUp teXet X-driver Quad Mobile
- BackUp teXet X-driver 4G Mobile
- BackUp teXet X-driver Mobile
- BackUp teXet X-cosmo Mobile
- BackUp teXet X-basic 2 Mobile
- BackUp teXet X-basic Mobile
- BackUp teXet X-alpha Mobile
- BackUp teXet TM-6003 Mobile
- BackUp teXet TM-5581 Mobile
- BackUp teXet TM-5580 Mobile
- BackUp teXet TM-5571 Mobile
- BackUp teXet TM-5570 Mobile
- BackUp teXet TM-5513 Mobile
- BackUp teXet TM-5505 Mobile
- BackUp teXet TM-5377 Mobile
- BackUp teXet TM-5277 Mobile
- BackUp teXet TM-5204 Mobile
- BackUp teXet TM-5201 Rock Mobile
- BackUp teXet TM-5200 Mobile
- BackUp teXet TM-5081 Mobile
- BackUp teXet TM-5077 Mobile
- BackUp teXet TM-5076 Mobile
- BackUp teXet TM-5075 Mobile
- BackUp teXet TM-5074 Mobile
- BackUp teXet TM-5073 Mobile
- BackUp teXet TM-5071 Mobile
- BackUp teXet TM-5070 Mobile
- BackUp teXet TM-5017 Mobile
- BackUp teXet TM-5005 Mobile
- BackUp teXet TM-5003 Mobile
- BackUp teXet TM-4677 Mobile
- BackUp teXet TM-4577 Mobile
- BackUp teXet TM-4513 Mobile
- BackUp teXet TM-4510 Mobile
- BackUp teXet TM-4504 Mobile
- BackUp teXet TM-4377 Mobile
- BackUp teXet TM-4083 Mobile
- BackUp teXet TM-4004 Mobile
- BackUp teXet TM-4003 Mobile
- BackUp teXet TM-3204R Mobile
- BackUp teXet TM-3200R Mobile
- BackUp teXet TM-3000 Mobile
- BackUp teXet iX-mini Mobile
- BackUp teXet iX-maxi Mobile
- BackUp teXet iX Mobile
- BackUp teXet TM-5834 Pay 5 Mobile
- BackUp teXet TM-5583 Pay 5.5 Mobile
- BackUp teXet TM-5084 Mobile
- BackUp teXet TM-5584 Mobile
Learn about these options before backing up
- Backup complete: Your upload is complete and you have no more items to backup
- Waiting for connection or Waiting for Wi-Fi: Change your settings or connect to a Wi-Fi or mobile network.
- Backup is off: Backup and sync turned off. To start a backup, press Turn on Backup.
- Backing up: Your photos and videos are currently being backed up. You will also find the number of items left.
- Preparing backup or Getting ready to back up: Your photos and videos are ready to be backed up.
Choose your mobile solution
- Android Phone Hard Reset
- Android Phone Unlock
- Android Phone Flash File
- Android Phone Secret Codes
- Android Phone Software Update
Before Backing up the files
- Know the different backup methods and choose the one that works best for you.
- Make sure your phone’s battery level is above 60%.
- It is best to use a network connection when processing a backup.
- You can choose the best quality.
Back up Your Android Data
- First turn on your teXet Android Mobile, Hold down the power button.
- After that, Go to the Settings menu on your mobile.
- In this step, Find and Select Back Up and Reset.
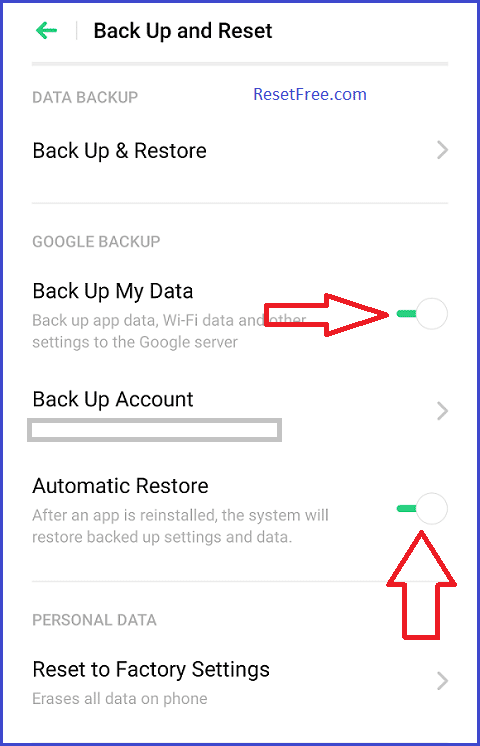
- After that, Turn on the Backup My Data option.
- Completed.
How to Set Back up Account
- First turn on your teXet Android Mobile, Hold down the power button.
- After that, Go to the Settings menu on your mobile.
- Next, Find the Backup and Reset option.
- Afterward, Tap on the Back Up Account option.
- In this step, Add Your Back Up Account.
- Completed.
How to Create a Backup
- First turn on your teXet Android Mobile, Hold down the power button.
- After that, Go to the Settings menu on your mobile.
- Next, Find and Select Back Up and Reset.
- Afterward, Choose the Back Up and Restore option.
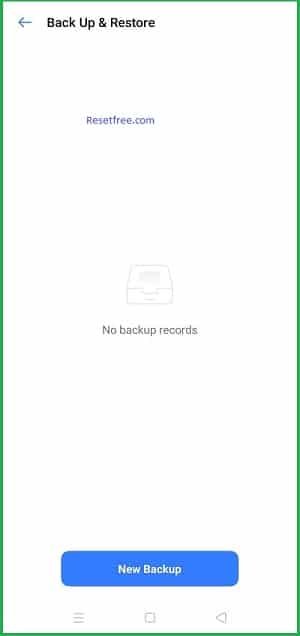
- Then select Create a new backup option.
- Finally, Tap on the Start backup.
- Completed.
How to Set Up Automatic Restore
- First turn on your teXet Android Mobile, Hold down the power button.
- After that, Go to the Settings menu on your mobile.
- Next, Find and Select Back Up and Reset.
- Finally, Turn on the Automatic Restore option.
- Automatic Restore, done.
Backup your Photos and Videos – Google Photos
- First, Open the Google Photos app on your teXet mobile.
- Then, log in to Google Photos with your Gmail.
- After you log in, Tap on the Settings (At the top right of the search bar).
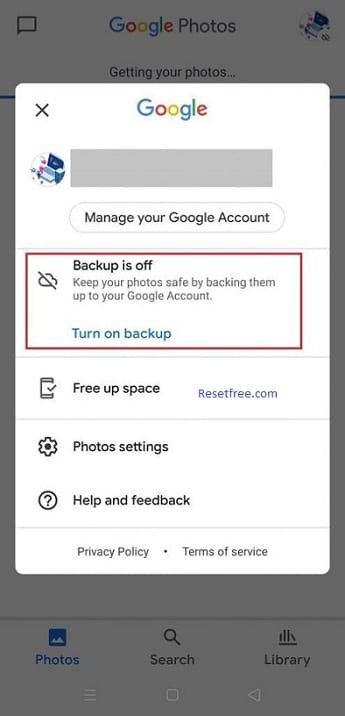
- Now, tap on the option Turn on Backup.
- You’re all ready, now your photos and videos will be backed up to Google Photos.
- If you want to back up photos and videos of another folder.
- Settings > Photos settings> Backup & sync > Back up device folders.
- Backup completed.
Backup your Photos and Videos – Google Drive
- First, Open the Google Drive app on your teXet mobile.
- In this step, log in to Google Drive with your Gmail.
- Then, open your File Manager on your mobile.
- Select all the documents you want to back up to the drive.

- After selecting the documents you want to backup, tap on the Send.
- After you click the Send option, select Drive from all available options.
- Finally, select SAVE and all the selected documents will be uploaded to drive.
- To restore backup data from Drive, open Drive and select the file you want to download.
Backup Your Phone to SD Card
Most media such as videos, music, and photos on your device are saved directly to your Android SD card. If this is not the case you can select the data in the “My Files” app on your device and select “Move” from the menu button.
You can select the Android SD card as the destination folder and the data will be saved on the card. Your Android SMS, bookmarks, call logs, contacts, audio, photos, or DCIM photos would be backed up to the SD Card now.
Backup Your Phone to PC
Photos, videos, and music can be transferred directly from your Android phone to your PC or Mac by plugging your phone into your computer and manually copying files to your hard drive. It’s not the right solution, but it’s quick and easy, especially on a PC with Windows mounting it as an external drive.